
Exposure triangle

Photo by Annie Spratt on Unsplash
The basics:
In photography, one talks about exposure as a way to describe the ‘set up’ of a picture. Photography comprises mainly of 3 main aspects that make up the ‘exposure’:
• Aperture
• Shutter speed
• ISO
These three things together make up the so called ‘exposure triangle’. It is called a triangle, because it aims to express the relationship between each component. Any change to either one of those aspects will automatically alter the other components and the photographer needs to understand this and adjust accordingly.

There are many different metaphors that try and explain this concept. My favorite one is this:[1]
Imagine your camera being a window with shutters that open and close. The bigger the window (aperture), the more light comes in and the room gets brighter. Shutter speed is the time the window shutters are left open. The longer you leave the shutter open, the more light comes in (regardless of how big or small the window itself is). ISO would best be described as the sensitivity of the material the light shines on. One metaphor used is tanning.
[1] credit to www.digital-photography-school.com)
If you lay in your room in front of a window on a sunny day, then you get more tanned, the longer you leave the window open and the bigger the window is. Instead of your skin, ISO measures the sensitivity of the film itself. In digital photography, ISO (the sensitivity) can be electronically adjusted for each picture. In film photography, you can buy different film rolls that have different ISO numbers (e.g. 400).The reason why all of this is important, is because different exposure settings are used for different scenarios and understanding this is essential to any photographer.
If you use the wrong setting for your type of picture or scenario, then chances are you mess up the shot (blurred image, over- or underexposed, wrong focal point, etc).

Source: www.exposureguide.com
The next three chapters will explain each of the component and then we will look at how all of this plays together.
Aperture
Form a circle by placing the tip of your index finger on the tip of your thumb and look at it. Now steadily decrease the size of the hole you look through by rolling in your index finger. Aperture on a camera is pretty much the same (see example above with the window size). Aperture is controlled by the lense, not the camera. There are blades in your lense, that depending on the aperture setting you use, open or close and thus let more or less light through. If you have a detachable lense with aperture ring controls on it, remove the lense and look through it while changing the aperture setting. You will see something similar to the below.

Aperture. (c) Robert Patterson
Aperture is primarily used to control what is called the ‘depth of field’. Aperture settings are expressed in so called ‘f-stops’. Confusingly the lower the number or f-stop, the higher the aperture or light exposure and vice versa. Different lenses have different maximum apertures and generally speaking one could say the lower the maximum f-stop number, the better (other factors such as build quality aside).
So what does this depth of field mean?
Wikipedia tells us this: “…the distance between the nearest and the furthest objects giving a focused image”.
An easier way to understand this is by looking at the below image. Depth of field is controlled by using both your focusing ring and your aperture. By shifting the focal point (the point in a frame you focus on), you can bring in focus different areas of an object or a frame and blur out others. The higher the aperture (i.e. lower f/stop), the higher the depth of field and the higher the blur effect. This blur effect is also called ‘bokeh’ effect and some lenses and cameras produce better bokeh than others. Bokeh is the creamy, soft blur effect you get when you use high aperture values.

Aperture and depth of field. Source: www.damienfournier.co
Below is another example of this effect. You can see the yellow lamp in front of the image being in focus (sharp with good contrast) and the other lamps being out of focus and blurred. The photographer has achieved this by increasing the aperture and by placing the focus on the object he wanted to highlight (in this case the yellow lamp). He could have used the same aperture setting and focus on the red lamp instead, blurring out both the yellow lamp in front and the other 3 lamps in the back. Or he could have focused on the last lamp only and blurring out all the other lamps before. You get the picture (pun intended).

Bokeh effect. Source: Google image search
Aperture and depth of field is used to highlight objects or people in a photograph and make them stand out. This is most commonly used in portrait photography.

Portrait bokeh. Source: www.digital-photo-secrets.com
What you can see in this image, is how the girl is beautifully in focus, while the Christmas tree in the back is blurred out and thus directing the viewers’ attention to the girl and making her stand out of the image. Aperture is a very important tool to control creativity in a shot.
On the flip side, if you want everything in a scene to be in focus (e.g. landscapes), then you need to set your aperture to a higher setting. This is important to remember when you want to make sure that everything in your picture is sharp and in focus.

Far depth of field. Everything in focus. Source: www.flipboard.com
Shutter speed
The scale of shutter speeds however is always the same and typically ranges from 1/5000 of a second (or even much less) to 30 seconds or bulb (bulb is a function where you can press the shutter for as a long as you wish and the shutter stays open).Different shutter speeds are used for different scenarios. Rule of thumb is that you use short shutter speeds for ‘freezing’ fast moving objects (e.g. used in sports photography, car races, etc) and slow shutter speeds for static objects or when you deliberately want to show motion.
Shutter speed, as the name suggest, is the speed of which the shutter (the window or curtain) closes when you press the shutter (the ‘take a picture’ button). The shorter the window is open, the less light comes through and vice versa. Shutter speeds are expressed in fractions of seconds. Shutter speeds are controlled by the camera and different cameras have different shutter speed ranges (min and max).
Best way to explain this is by looking at the below images.
Shutter speeds. Source: www.cornicello.com
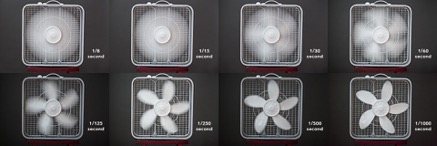
Since it was open only so shortly, the camera had no time to absorb more than this fraction of a frame and by looking at this image, it is no clear if the fan was moving or not.You sometimes see this effect in video recordings of propeller planes. If the frame rate of the recording camera isn’t fast enough, then the fan blades of the propeller appear to turn very slowly.
Applications of this can be typically be seen in sports photography. The picture below shows a wake boarder performing a jump and his motion appears to be frozen. This was achieved with a fast shutter speed.
The top most left fan was shot with a slow shutter of 1/8 of a second, which is considered a slow or long shutter opening. Since the shutter was open that long, it could record a lot of frames (in this case the movement of the fan) and looking at this picture, you understand that this was shot while the fan was moving. The other end of the scale would be the bottom right image, shot at 1/1000 of a second. This is a fast or short shutter speed.

Fast shutter in sports photography. Source: www.picture-power.com
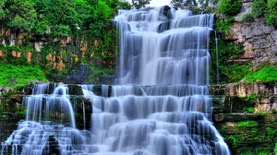
The image below of a water fall used a slow shutter to create this silky-smooth water effect. The shutter was open long enough to record several frames of the water flowing and this created this beautiful shot.
Slow shutter speed. Source: www.photographytuts.co
One important thing to understand with shutter speeds is, that there is a limit for handholding cameras in the lower end of the shutter speed range. Shooting the above waterfall image would have not been possible by handholding the camera. This shot was taken using a tripod to remove any camera shake. If you are handholding your camera with a slow shutter speed, then anything that happens to the camera in that time period is being recorded. So if you have even the tiniest of a shake in your hands, this will be recorded and thus distort the picture and make it blurry (but not in the good, aperture kind of way). This by the way is a typical beginners question: “why are some of my pictures so blurry?
Camera shake due to handholding slow shutter speed. Source: www.geofflawrence.com
The rule of thumb is that your shutter speed shouldn’t be less than the focal length of your lense. So for example if you are using a 50mm lense, then the shutter speed shouldn’t be lower than 1/50 of a second in order to avoid camera shake (and thus unintentionally blurring the entire picture). I try not to go below 1/60 of a second when handholding.
Another typical application of using shutter speeds to create creative effects, are so called light trail pictures. Typically taken at night and with a tripod, the camera is set to a very long shutter opening (i.e. slow speed) to record as much light as possible.

Light trails. Source: www.canonlensesforlandscape.com
ISO
Camera sensors and lenses are limited in how to dark they can go. Some cameras and most importantly, some lenses, are better than others. If you maxed out your aperture and reduced the shutter speed to the lowest possible setting for your situation (see handhold vs tripod) and the image still appears dark (i.e. either on your live view window or in the ‘manual’ exposure indicator), then ISO may help you to lighten up. Increasing the light sensitivity can help to let the camera absorb more light and thus make the image brighter.
There are however limits to how high you want to increase your ISO.
There the ISO effect on a picture is most visible, is at night. High ISO numbers produce grainy images and especially at night, or in low light situations, this is very visible. See the following image as example.
The last of the three exposure triangle components is ISO. ISO is abbreviated for International Standard Organization, the governing body that sets sensitivity for sensors.
Changing your ISO setting is adjusting your camera’s sensitivity to light As mentioned above, on digital cameras ISO can be adjusted for each shot individually. ISO ranges from anywhere between 20 to 20000 or higher. ISO is best remembered as sensitivity. The higher the ISO number, the higher the sensitivity. When it is sunny and bright outside, you don’t need much light sensitivity in your camera. When it is dark, shaded or cloudy, the camera’s ISO setting (when set to auto) tries to compensate for the lack of light by increasing the sensitivity of the sensor. ISO on most modern cameras and phones is set automatically depending on the lighting situation. As with the other 2 factors, it is however essential that you understand what ISO does and how to use it.
Drag the slider to see the effect different ISO settings have to the noise level of pictures. Left side is low ISO (100) and the right side is shot with high ISO (3200)


Source: https://loreleikatex.wordpress.com/page/4/
In film photography, the photographer has to choose and load the right ISO film for the desired assignment or lighting situation. This cannot be changed while shooting a roll of film. If you want to change the ISO for your shots, then you first need to finish your film roll (or waste the remaining images) and then load a different ISO film. Most film photographers have different films for different situations and plan their shoots accordingly.
When you load a roll of film, you need to tell your camera which ISO you are using, so that the camera knows how to read your aperture and shutter settings accordingly in order to indicate correct exposure.
While many photographers deliberately seek the grainy effect for artistic purposes (for the vintage feel of old film cameras), it is less desirable when all you want is a crisp and sharp image.
So if you are at your lowest possible shutter speed (for handholding), the highest possible aperture and the highest, noise free ISO setting, and your camera still tells you that the exposure is too dark, then maybe you are at the limits of your equipment and the only option now would either be to use flash or other external lighting sources, or to simply retake the shot at a different time (e.g. the next day).

ISO dial at a Pentax K1000 camera
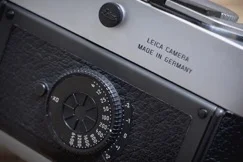
Leica ISO dial on the back
Making it all work together
So now that you (hopefully) understand each of the three exposure triangle components, let’s look at how they all play together.
Both modern digital cameras and most vintage cameras have so called light meters built into them. Light meters are tools that measure the available light of your surrounding (or of a specific spot in your frame) and process that information for the exposure reading. So when your camera tells you that your current settings are over- or under exposed, then it does so by comparing your settings to the available light outside your camera. We could talk a lot about the different light metering techniques and various, external light meter devices. But for now it is just important to understand, that light metering is your camera reading the available light and comparing it to your current settings.
A good explanation for light metering is the picture in front of a window scene.

Dark silhouette against bright window. Source: www.lifehack.com
The camera (depending on the setting and camera type), will most commonly read the light from the largest part of the frame and that’s the window. it will adjust the focus in a way to ensure the window and everything outside is correctly exposed. Thus any object in front of the window is ‘disregarded’ from a light and focus point of view and is therefore underexposed (i.e. dark).
Every one of the above explained components and settings have a direct impact on each other and this is what is referred to as the exposure triangle.
If you want to take a sport shot in a dark environment (i.e. reducing the shutter speed to a low value in order to freeze a moment), then there is less time for light to come through the lense and thus your aperture or ISO need to be increased. If you increase ISO, you need to remember that high ISO produces grain.he thing to remember with aperture, is that it controls depth of field and if you adjust your aperture to compensate for poor light (while leaving the shutter speed high), then this will also change the depth of field and possibly de-focus certain areas of your picture.
Each light situation and scenario present its own requirements and you need to understand how these settings all play together. Some modern digital cameras have a live view feature, showing you how your settings impact the final result on your camera’s display. The best possible way to learn however, is simply by going out and taking pictures.
Next chapter: Composition
Previous chapter: Introduction